Focus Stacking in Macro Photography
With the purchase of my first real macro lens, I have been investigating the world of the small! One of the things I learned in my research is that the depth of focus of macro images is very small, and there is a limit to how much you can increase the depth of focus with smaller apertures. As I tried to explain in a long post on Photography Talk, there is a sweet spot for clarity and depth of field at around f16 – go much smaller than this and the diffraction caused by light being affected by the tiny size of the aperture ring tends to introduce more blur rather than give you more focus. So, if you are around the f16 range, how do you get real depth of field? One approach that works in a studio with a tripod is a technique known as focus stacking. The basic idea is that you create multiple slices of the same subject with each slice being an area of accurate focus – start at the point closest to the subject and take a shot, focus slightly further away, take a shot and so on.
It can be done by manually twisting the focus ring, but the best approach is to physically move the camera towards the subject to get different slices of focus. The reason for this option is that changing the focus on a lens does actually change the focal length and the perspective. Together with my new macro lens (a Canon 100mm f2.8L), I invested in a macro focusing rail to move the camera backwards and forwards in controlled steps. The basic set up is shown on the left. The camera is set to manual focus and fixed in the macro rails. Lighting is provided by a Rogue Flashbender on my Canon 550EX behind and slightly above the subject, and I also had a second 550EX providing some fill light to the front edge of the coin (not visible in this shot). I have a Canon ST-E2 providing remote control over the flash guns, but I usually set those to manual strength and so I am not really using the features of the ST-E2. It really is just triggering the flashes when needed.
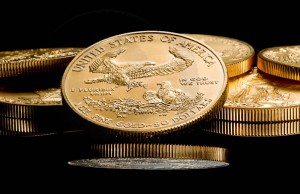
I used live view with the magnification option to focus on the very front edge of the coin and took the first shot. Then I moved the camera forward to focus on the bottom quarter of the coin for the second shot, then about halfway up it for shot three and so on. For one coin leaning away from the camera, I took about six shots. By the way, the surface is the black lacquered top of a piano, which gives a nice deep black reflecting surface for these sort of images.
I then imported the images into Lightroom, and adjusted white balance, exposure, blacks, clarity and saturation, and then sync’d across the other shots so that they all had the same settings. Then I selected them all, right clicked and selected Edit as Layers in Photoshop to get them all into one file as individual layers. The next step is important, because although the pictures were taken on a tripod, and you would think that they would be aligned, in reality, you are moving the camera in a significant way for such a small subject, and so the perspective and scale is quite different between the images. So step one is “Auto Align” which adjusts each image to accurately register it with the others. Then I use Edit>Auto Blend Layers and choose the “stack images” option. Photoshop does some real magic now to find the areas of each image that is really in focus and masking out the rest so that you get the best pieces of each bit of the overall subject. Assuming it looks right, you can now flatten all layers to get a smaller and workable file size and do any remaining adjustments such as cloning out the really sharp pieces of dust that seem to always collect somewhere on a shiny surface! I wanted to create an image with the feeling of luxury and wealth (thanks to a friend who loaned me the coins!) and I think this one really captures that spirit. Lets see how well it sells!


2 Responses
[…] […]
[…] […]