Isolating a subject against white background
This short article covers a photographic isolation – setting your subject against a pure white background to make it easy to change the background or add the subject to a different composition. It is similar to blue (or green) screening but is sometimes easier to achieve without any specially colored backgrounds or cloths. A typical picture isolated against white would look like this:
And after a little bit of Photoshop work, the background can be removed and replaced by a more pleasing design:
Perhaps a bit of a strange choice of an example, but it shows that with a bit of work, the light background can be replaced by something with very different tones!
So, how is it done? Generally speaking, you need at least two flash guns, preferably three, and some means of triggering them off the camera. I’ve bought my Canon 550 flashguns off eBay – they are not the latest model (that is the 580), but they are powerful, controllable, and much less expensive than the current version. As a Canon person, I use the ST-E2 flash controller – an infra-red device that sits in the hot shoe and can automatically control the flash exposure of two separate groups of flash guns.
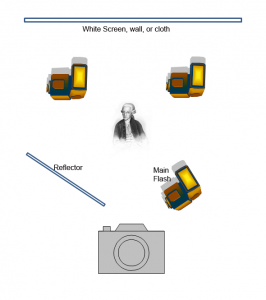
All you then need is a plain wall, white cloth, or board. The wall doesn’t actually need to be white as you are going to light it with sufficient power that it appears to be over-exposed to the camera, but the closer to white it is, the less power you will need. The schematic:
If you can dedicate two flash guns to the background to get a flatter wider area of light, place them behind and to either side of the subject. Make sure that the flash tube is not visible to the camera – they should be facing inwards towards the center of the backdrop, but no light should be falling on your subject. You may have to use a card to block any extraneous light if necessary. Your subject is then placed in front of this arrangement with the main flash (in an umbrella perhaps) and a reflector to fill in the shadows.
Although the Canon flash guns can be automatically controlled by the camera to give the correct light, I’ve found it easier to use them on manual. I normally set the camera to about f11 (shutterspeed around 1/125 although that doesn’t really matter). I then have my rear flashguns set to ¼ or ½ power and I take a few shots to see if the background is really being blown out (lots of blinkies in the LCD will show the area that is being over-exposed. Once the right combination of aperture and flash power is achieved, I bring the subject in, and adjust the main flash power to properly light the person (or cat). The advantage of using less than full power on portable flashes is that they recycle very quickly which helps if your subject is not very controllable!
For head and shoulders shots, you can easily get away with one flash gun behind the body of the subject – you will get a circular area of white behind their head, but remember that you don’t have to make the whole background white – as long as the area around the head and shoulders is blown out, that is all that is required.
When the pictures have been completed, move along to Photoshop and start to extract the subject from the background. You can use a “Levels” layer to brighten the background if it is not pure white, as you can easily remove that later once you have extracted the subject. The latest version of Photoshop has greatly improved the extraction process as you can roughly select the subject with the “Quick Selection” tool and then refine the edge to get all the hair selected properly. I normally create a mask from this selection so that I can paint on the mask if necessary to get a better edge. A composite is easier if the background is close in shade to the original background – ie replacing a white background with an image of a dark book lined study does call for a lot more time in getting a perfect mask, but as the example above shows, a reasonable mask can be produced without a lot of effort.


