This is the first of two articles about how to extract a subject from its background to create a new stock photo.
Isolating an object to composite it into a new image is one of the key skills of a digital artist or photographer, and many stock images are deliberately taken against a pure white background to make it easy for a designer to cut the image out and place in a new image. The normal technique is to create a white background by overexposing a white cloth or paper background, but that can often cause details on the edge of an object – especially fine hair on an arm, for instance – to disappear in the over-exposed white background. Adobe’s Lightroom has a great tool that makes extraction and isolation a cinch!
But, to step back a little, green chroma key backgrounds have been a key part of movie making (and the weather forecast) for many years. The principle is that you light the subject against a pure green background and then remove the green in software (or video hardware) and replace it with an alternative background. Green is chosen because the color is not found in human skin, and if clothing is suitably chosen, those will not be affected either.
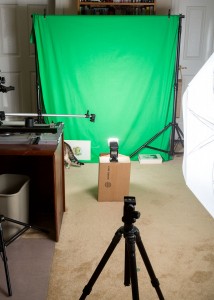
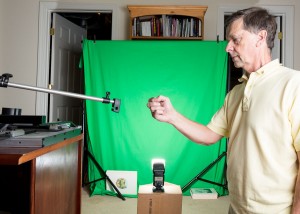
You can buy green dyed cloth in various sizes – I bought a 10 Ft X 13 Ft Chromakey Green Screen Muslin Backdrop from Amazon for $29, and, after ironing it to remove creases, hung it from a framework to create my backdrop. For this example, I was planning to create an image of a coin being tossed and so I only needed a relatively small backdrop – using a long lens (100mm in my case) also helps as it has a narrow field of view and it is always easier to evenly light a smaller area of background than a large one. My studio in this case was pretty simple – the green background lit by a single flash standing on a cardboard box, a flash shooting through a white umbrella at the subject, and the camera with an infra-red transmitter to trigger the flashguns. With the flash guns set to ½ power I used f8 at ISO200 on the camera.
When you are shooting yourself as the subject with a remote control, you need to be sure that the focus is accurate – that is the purpose of the lightstand sticking out from the left. I can focus the lens on that, then slide it back out of the way and place my hand with coin in the same position for the shot.
After a good few tosses of the coin (a US dollar coin to give it a little coloration and size), I was ready to start the image processing. My plan was always to get a good shot of the spinning coin and one of the hand – I could always composite the two elements together for the final shot.
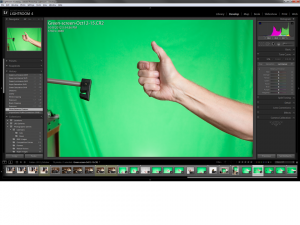
Opening in Lightroom gives the uncropped view of the image from the camera after white balance had been set (using the grey of the lightstand used for focus). I made any small adjustments for exposure, white point, black point at this stage.
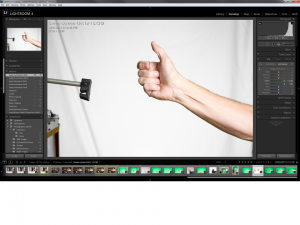
Then move to the HSL section of the Develop tab and use the “picking” tool to decrease the saturation of the green background. Note that I tried to keep the green cloth as straight as I could behind the key part of the image – the hand. Different shadowed areas make it a bit more difficult to remove the background in processing. You can also see that the only sliders that are impacted by the color selection tool are the Green and Aqua ones. These colors are also not present in the skin color of the arm and adjusting them makes no difference to the saturation of the hand and arm. Reduce the saturation to -100.
Now move to the luminance choice and repeat, but this time, increase the luminance. I moved it up to +80 as it isn’t necessary to get a white background – just create separation from the hand.
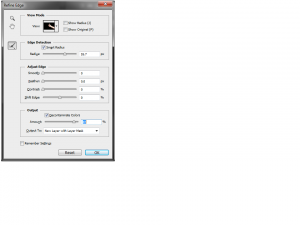
Right click to choose “Edit in Photoshop.” I used the Quick Selection Tool to run over the arm and hand and create a reasonable selection of the subject. Then move to the Refine Selection tool and create a reasonably wide radius to catch all the small hairs on the arm. My setting of 55 pixels worked fine in this case, although using the selection paint tool to paint over the hairs to assist the program in finding the edge of the selection works fine as well. I also wanted to get rid of any last remaining green coloration that is reflected in the very edge of the hand off the screen by selecting the “Decontaminate Colors” option in this dialog. Sliding the “Amount” over to the right removed those trace colors and resulted in a masked selection in the layer panel. You can slide this masked layer across into your main subject, or, alternatively, fill the background with pure white to get a traditional cut out of the image against a white background.
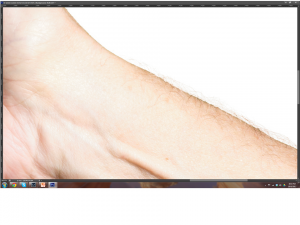
What is interesting in this technique compared to taking the image against an overexposed white background, is the remaining detail in the fine hairs on the arm. Normally those would be very difficult to resolve as hair is translucent and strong light from behind floods through the hair making it almost transparent. In this technique, the background doesn’t need to be blown out, and so the hairs are still visible in this 140% enlargement.
Could you do this with a simple white background that isn’t overexposed – yes, but you have no control over its luminance once the shot is taken – if you want to make it lighter to make a separation from the subject easier, the whole image will become lighter – you cannot work in the background alone. A green screen gives you this control – you can change its color or hue, change the brightness and make and edge detail and coloration similar to the background you are planning to composite the subject into. If you have a dark background, the last thing you want is a bright edge to the subject from the reflections of an overexposed white screen – with this Lightroom approach, you could decrease the luminance to get a better match with the final composite image.
Here is my final coin tossing image isolated against white for a stock photo:
This approach may not work with all subjects, but for any that are free from green colors, it works simply and quickly to give you a good cut-out for your vision!
For a second technique that I later found, please read this article about Extraction and Blending Techniques



what are you using as a light source?
Sorry – only just saw these comments. I’m using multiple flashguns
awesome thanks.