Product Review – X-Rite Colorchecker Passport
I recently went to a photo exhibition and browsing the vendor stalls came across the X-Rite Colorchecker Passport. This is a very nicely made product that solves one specific problem – how to get the correct white balance and color saturation on your images as light conditions change. Every camera has software and algorithms that process the data coming from the sensor and creates an image – these are very complex and so the color that you first see in Lightroom or your processing system is a best effort at creating the colors you saw when the image was taken. The Colorchecker gives you a much more accurate display of colors by using a known and calibrated set of color panels and comparing that with the image itself.
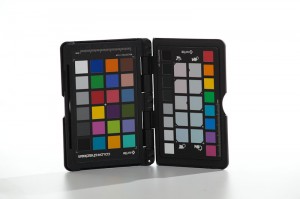
The device is a small hard plastic case measuring 5 x 3.5 inches and about a 1/4 inch thick. It fits nicely into one of the pockets of my camera bag. The basic idea is that you take one photo of the color panels contained in this wallet at the location of your photo shoot. Light doesn’t change that frequently, and so a picture in a studio setting or one in the open prior to landscape shots is all that is needed. Here is one I took just prior to photographing the cats described in the previous post:
Sorry this is upside down – just the way I stood it on my shooting table!
The device comes with a software program that puts plugins into your photo processing software. I use Lightroom and Photoshop and the software placed “Export” plugins into both.
After the photoshoot, you download the images into Lightroom, select this one of the Colorchecker, and without any editing or cropping, Export it to Colorchecker. In the background, the plugin analyses the image, locates the various color squares and creates a color profile for my specific camera in the light conditions for that photo shoot. You give the profile and name and restart Lightroom to make it available.
I then open one of my photos from that shoot and first use the eye-dropper associated with the White balance and select one of the small grey panels on the left of this image. That sets the white balance to show that square as pure grey. I then go to Camera Calibration in the Develop panel, and select my new color profile in the “Profile’ drop down box. This image is now correctly white balanced and has the accurate colors. I simply select all the other images from the shoot and sync the settings to them all, so that all photos are now correct. I can then do more detailed editing on the best images from the shoot.
Does it make a difference? In terms of white balance, it solves what is often a tricky problem – trying to decide what is a pure grey in an image to get the white balance correct – it is very fast and easy to do that. The colors themselves are definitely better – it doesn’t make garish changes – the differences are subtle but a definite improvement. I’ve inserted a before and after image of one of the cats from my shoot – the only thing I altered was the white balance and color profile – no other edits or manipulations. I hope you can see the difference!
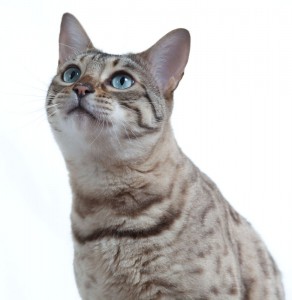
Original image straight from camera
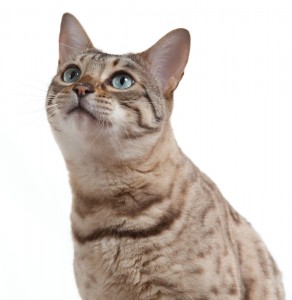
White balance corrected
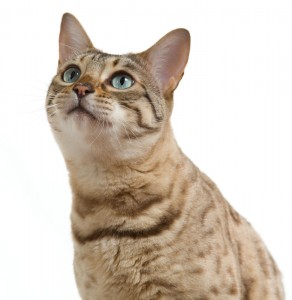
Color correction profile applied
As you can see, the white balance displayed the warm colors of the cat, but the color correction successfully displayed the orange and light brown of the fur.
The device isn’t cheap – $99 on Amazon – but it is very well made and will save me a lot of time trying to adjust images to correct for color casts or to get the special photograph. I do have to remember to bring it out and take a photo, but that will soon become a routine.
Not essential, but very valuable if you take photography seriously!
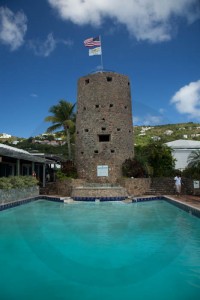
For an example that shows a more dramatic change, simply from applying the correct color profile, here are two images from St Thomas (Blackbeard’s Tower). The first one has been correctly balanced for the gray point, the second one has had a color profile added using a photo I took of the ColorChecker in similar light on the island. It show the big difference you get in saturated colors that are not obvious in the cat pictures:
Check out the link to Amazon here:
Note: I posted an updated review of the Colorchecker Passport here.



2 Responses
[…] to show all the photos marked with a flag, and then go through each one in turn to properly set the white balance and color profile and then set exposure, black point, clarity and some vibrance or saturation. I don’t apply […]
[…] Passport Color Calibration Late in 2010, I bought the X-Rite Color Checker Passport and did an initial review of this color management aid. I’ve been carrying this small plastic case around in my camera bag, and I do pull it out and […]