
Bryan Peterson Creativity Workshop
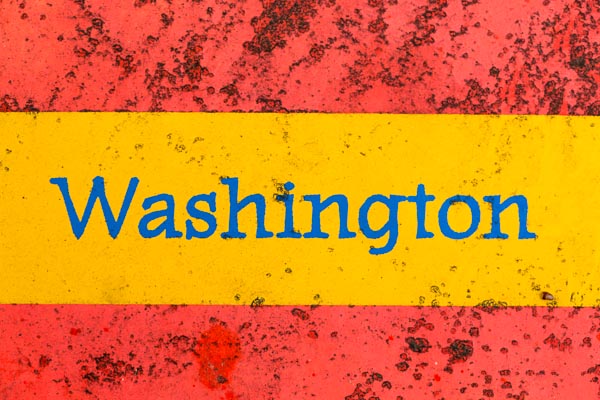 I tend to be a photographer who learns by seeing a neat idea, researches how to do it, and then incorporates that technique into my workflow. I’m not good a watching online videos, and have never been on a training course. So, what I am doing spending $695 on a two day creative photography workshop with Bryan Peterson? I saw Bryan speak at last years Nature Visions Expo in Northern Virginia and really enjoyed the day. He is full of creative shots, amusing anecdotes and a way of creating images to illustrate a concept – perfect for stock photography. As he told me during this workshop, he has stopped focusing on producing new stock – the return on investment is too low compared to how it was in the past – but he has not stopped his search for images in every street. So, I signed up for 2 days in Washington DC on Bryan’s course. After a meet and greet, we agreed to meet the next morning and get our creative juices flowing. The overall structure of the session is to learn new techniques in camera (and later in Photoshop), but also to train your eyes to see interesting shapes, textures and images all around you. Not necessarily for stock – although some of the images we saw would fit nicely on FineArtAmerica as artistic prints – but just to open you to new possibilities. After a day and a half of shooting, the final afternoon is spent sorting and processing the images to get down to the best 10 shots. Bryan is hovering during this, helping and demonstrating techniques that he things would help. I don’t want to do a blow by blow account of the two days and so I will simply show my set of ten images together with some explanation of what I was trying to do. Are these all great shots – no, but they are illustrative of a new technique or approach that I discovered. My first shot (not one of my ten) was simply an image of “Washington” seen on the side of a newspaper stand. I have Virginia and Maryland as well and I can image a stock purpose for them. My first new technique was then a camera twist while zooming:
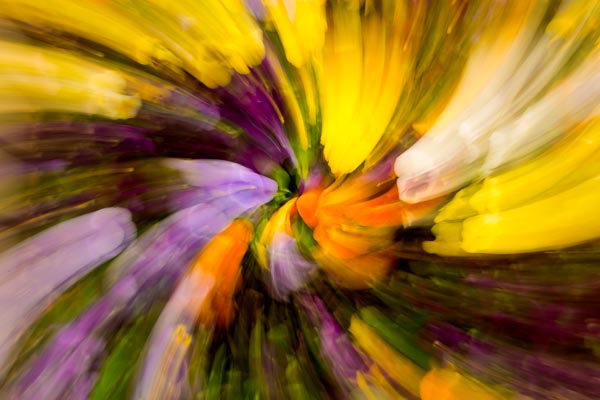
Camera Rotate using Zoom
The basic technique is to use a standard zoom, focus close on a flower or object and set the aperture to give a shutter speed of about 1/4 second. Hold the zoom ring (wide end of the zoom) and twist the camera body holding the zoom ring steady as the shot is taken. Done properly, this gives a great spiral image with the flower centered. It took some practice to get it right, but this could be a nice “fine art” print!
Next, we tried the same technique on cars and cyclists coming across an intersection to give a feeling of motion and movement – with a lot of tension about busy streets, danger etc.
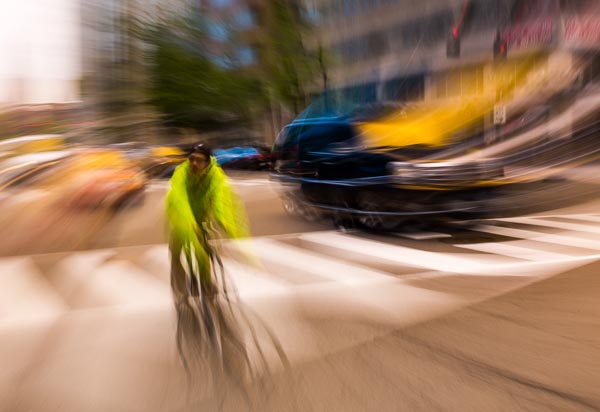
Beware of Cyclists
Just walking down the street, Bryan saw the remains of a scratched off sign on the glass panel of a newspaper stand. Macro lens out, coat hung over my shoulders to block out some reflections, and I have a great abstract and colorful image. Not sure what I will do with it, but I liked the idea.

Abstract Scratchings
By now, we had been out perhaps 3 hours and had gone no more than a couple of blocks from the hotel. So, after a quick lunch and a break to download images, we set off to the Botanical Gardens in Washington.

Triple Exposure
Up to this point, I had never explored double exposures in the camera – in fact, I didn’t even know they could be done with Canon cameras – but apparently in the 7D and 5D Mk3, it is now possible. This image was actually three exposures. The first completely out of focus, the second focused on the front row of tulips, the third focused on the back row. I’m sure it would have been better if the camera had been on a tripod, but it gave me some good ideas on how this could be used. You can do things like this in Photoshop, but doing it in the field and getting it right while you are on location seems a much better answer. I took some more stocky shots around the Capitol as we were around, but that isn’t the subject of this post. In the Botanical gardens, we worked on using flash to erase the background behind flowers – which works well, but with no flash modifiers was a bit harsh for me. Hence, not in my top 10.
Excited to be in Washington DC
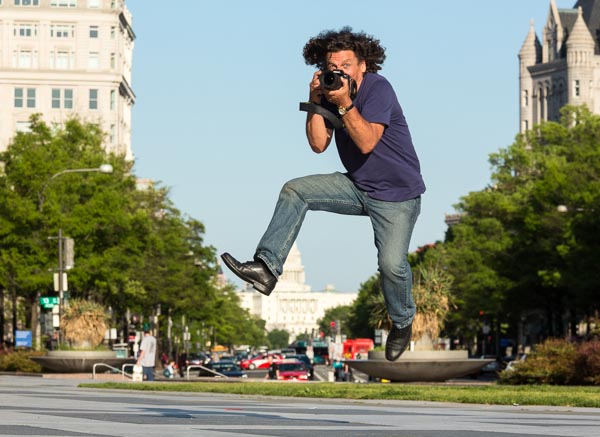
On to Pennsylvania Avenue in preparation for a night shot of the lights of cars leading to the Capitol, but first, we tried some jumping for joy shots by laying on the floor, getting the background right – the Capitol, and then getting the subject jumping with excitement at a great photo opportunity aligned. Good fun, and an example of how to create an image that illustrates a theme. While we were there, we asked a skateboarder to do a series of runs at the right location to place him in front of the Capitol. With the offer of some free images, he was very keen to show his technique, and so with low lighting from the late day sun, we captured some great action shots:
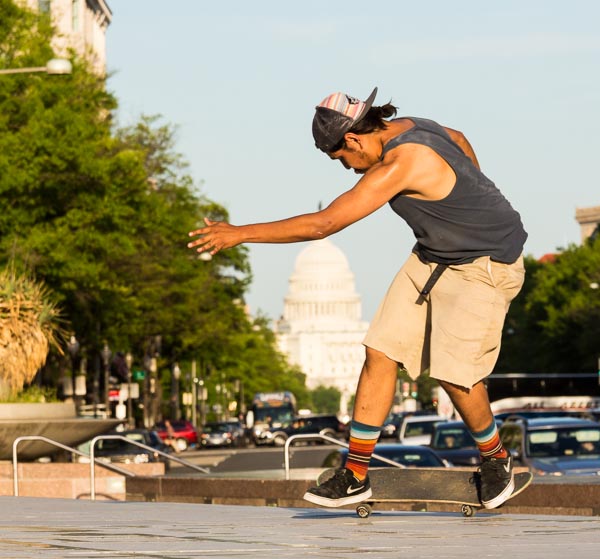
Skateboarding in Washington DC
As the sun set, we then focused on getting a good view down Pennsylvania Avenue to the Capitol with a slow shutter speed – 30 seconds – to get the light from cars coming and going down the street. Not too busy in Washington at that time, but still a nice stock shot of a famous scene:
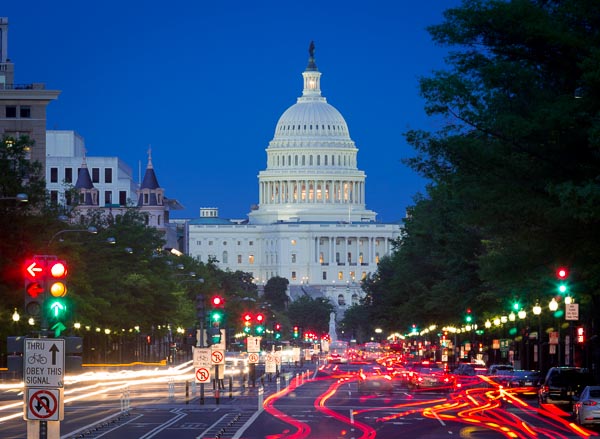
Pennsylvania Avenue at Night
Next day, we were out again at the Lincoln Memorial, trying both multiple exposures to overlay the words over the statue, and then to try to get a more dramatic image by lighting the pillars with flash with different gels.
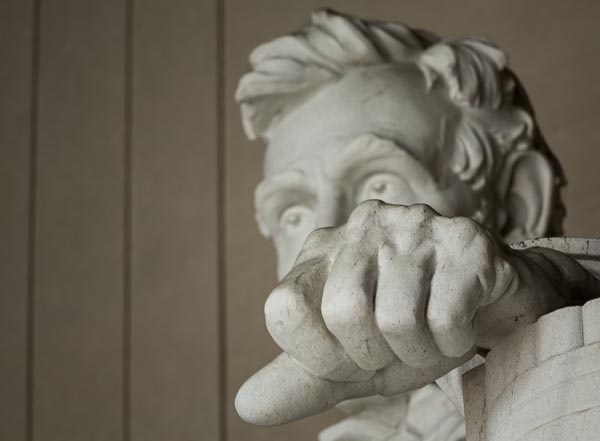
I’ve got my eye on you
My eye was attracted to the detail of the clenched fist on the chair of the statue, and so with a long lens, I focused just on the hand with the eyes deliberately placed just above. Gives a great impression of the statue of Lincoln from a new angle, I hope!
With our flashguns at the ready, we headed for the Korean War Memorial to light up the statues of the soldiers. It was too light for a general shot of the monument (with flash) and so we focused on the head of one soldier.
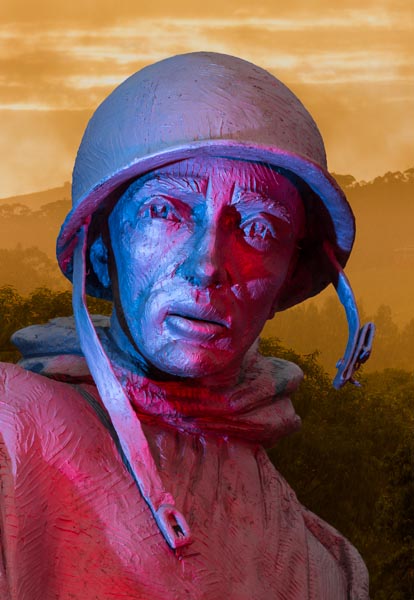
Jungle combat
With the red and blue flashes illuminating his face, the background went to a neutral grey, which was easy to remove in Photoshop to add a jungle monsoon type of background. Gives a lot more tension to the traditional images of this famous monument. While I was there, I saw the reflections of a group of students in red T-shirts visiting the memorial. They aligned very nicely with ne of the engraved heads in the wall surrounding the area, to give a great impression of this well visited site.

Many Visitors
After this, it was back to the hotel for selection and processing and the final “show and tell” before we all left around 5pm.
Was it worth it? I think my answer is a qualified yes. I was probably at the advanced end of the spectrum of skills in the attendees (at least in Photoshop), but there were definitely skills I learned about using my camera to create different sorts of images. Are they saleable as stock – maybe not, although they could be OK on Alamy and may sell as fine art prints on Fine Art America. Did I enjoy it – absolutely! The fellow students (eight of us in total) were great and we all helped each other to see and take interesting shots. I realized the importance of getting low to the ground for more impact on some shots, and saw images that I would have walked past in normal circumstances. It certainly made me think that other photo tours may be worth consideration.