
DIY 35mm Slide and Negative copying
Like many of you, I have a large collection of 35mm slides and negative film that I have taken over the years that are currently pretty much invisible. I ditched my slide projectors with the last house move (they were 240V and hadn’t been used in 20 years!) and so all the slides were stored in their boxes for some sort of future viewing! In my early years I took a lot of black and white films and so have all those negatives in those paper holders filed away. I’m not saying that these will be great for stock photo images, but there is a lot of my life stored in those boxes! So I’ve always wanted a way to scan them to digital and perhaps pick the best to share with family and friends.
About 7 or 8 years ago, I bought a Nikon 35mm film scanner – very expensive at around $500 and pretty slow (although extremely good) at scanning the film. I scanned perhaps 200 of my slides, but it was hit and miss which ones I picked. Then I sold it and more or less got about the same money, so it wasn’t that expensive an exercise. But apart from that, I kept it in my mind that I should do something. I know there are overseas companies that take boxes of slides and films and return them with digital scans, but I always thought I could do it myself with a bit of effort – and perhaps do a better job! So when I saw the Amazon prime sale of a Wolverine Titan scanner with a 20Mpixel capability for only $100, I thought my prayers had been answered!
But – when it arrived, it was disappointment time. First, I have quite a number of plastic mounts for my slides. I think I used Ektachrome and the film was returned in strips that you had to mount. The plastic mounts were just too big for the slide holder and so each one had to be inserted on its own – no pushing slide after slide through the machine. Ok, I guess I could work with that, but the quality of the scans was pretty poor. Here is a 100% view from a section of a 20Mpixel scan from the Wolverine followed by one from the device I am about to describe:


So enough preamble – what is this device? My Sony camera plus 90 mm macro lens! I saw quite a number of posts and videos on the web about holding the slide in a clip in front of the computer monitor and using a camera on a tripod, but it all looked very “heath robinson”, and so I set about building something that would be reliable, accurate, quick to change slides, be able to take negative film as well, and give me as good a quality as I could get. The result of this design challenge is here in all its glory!
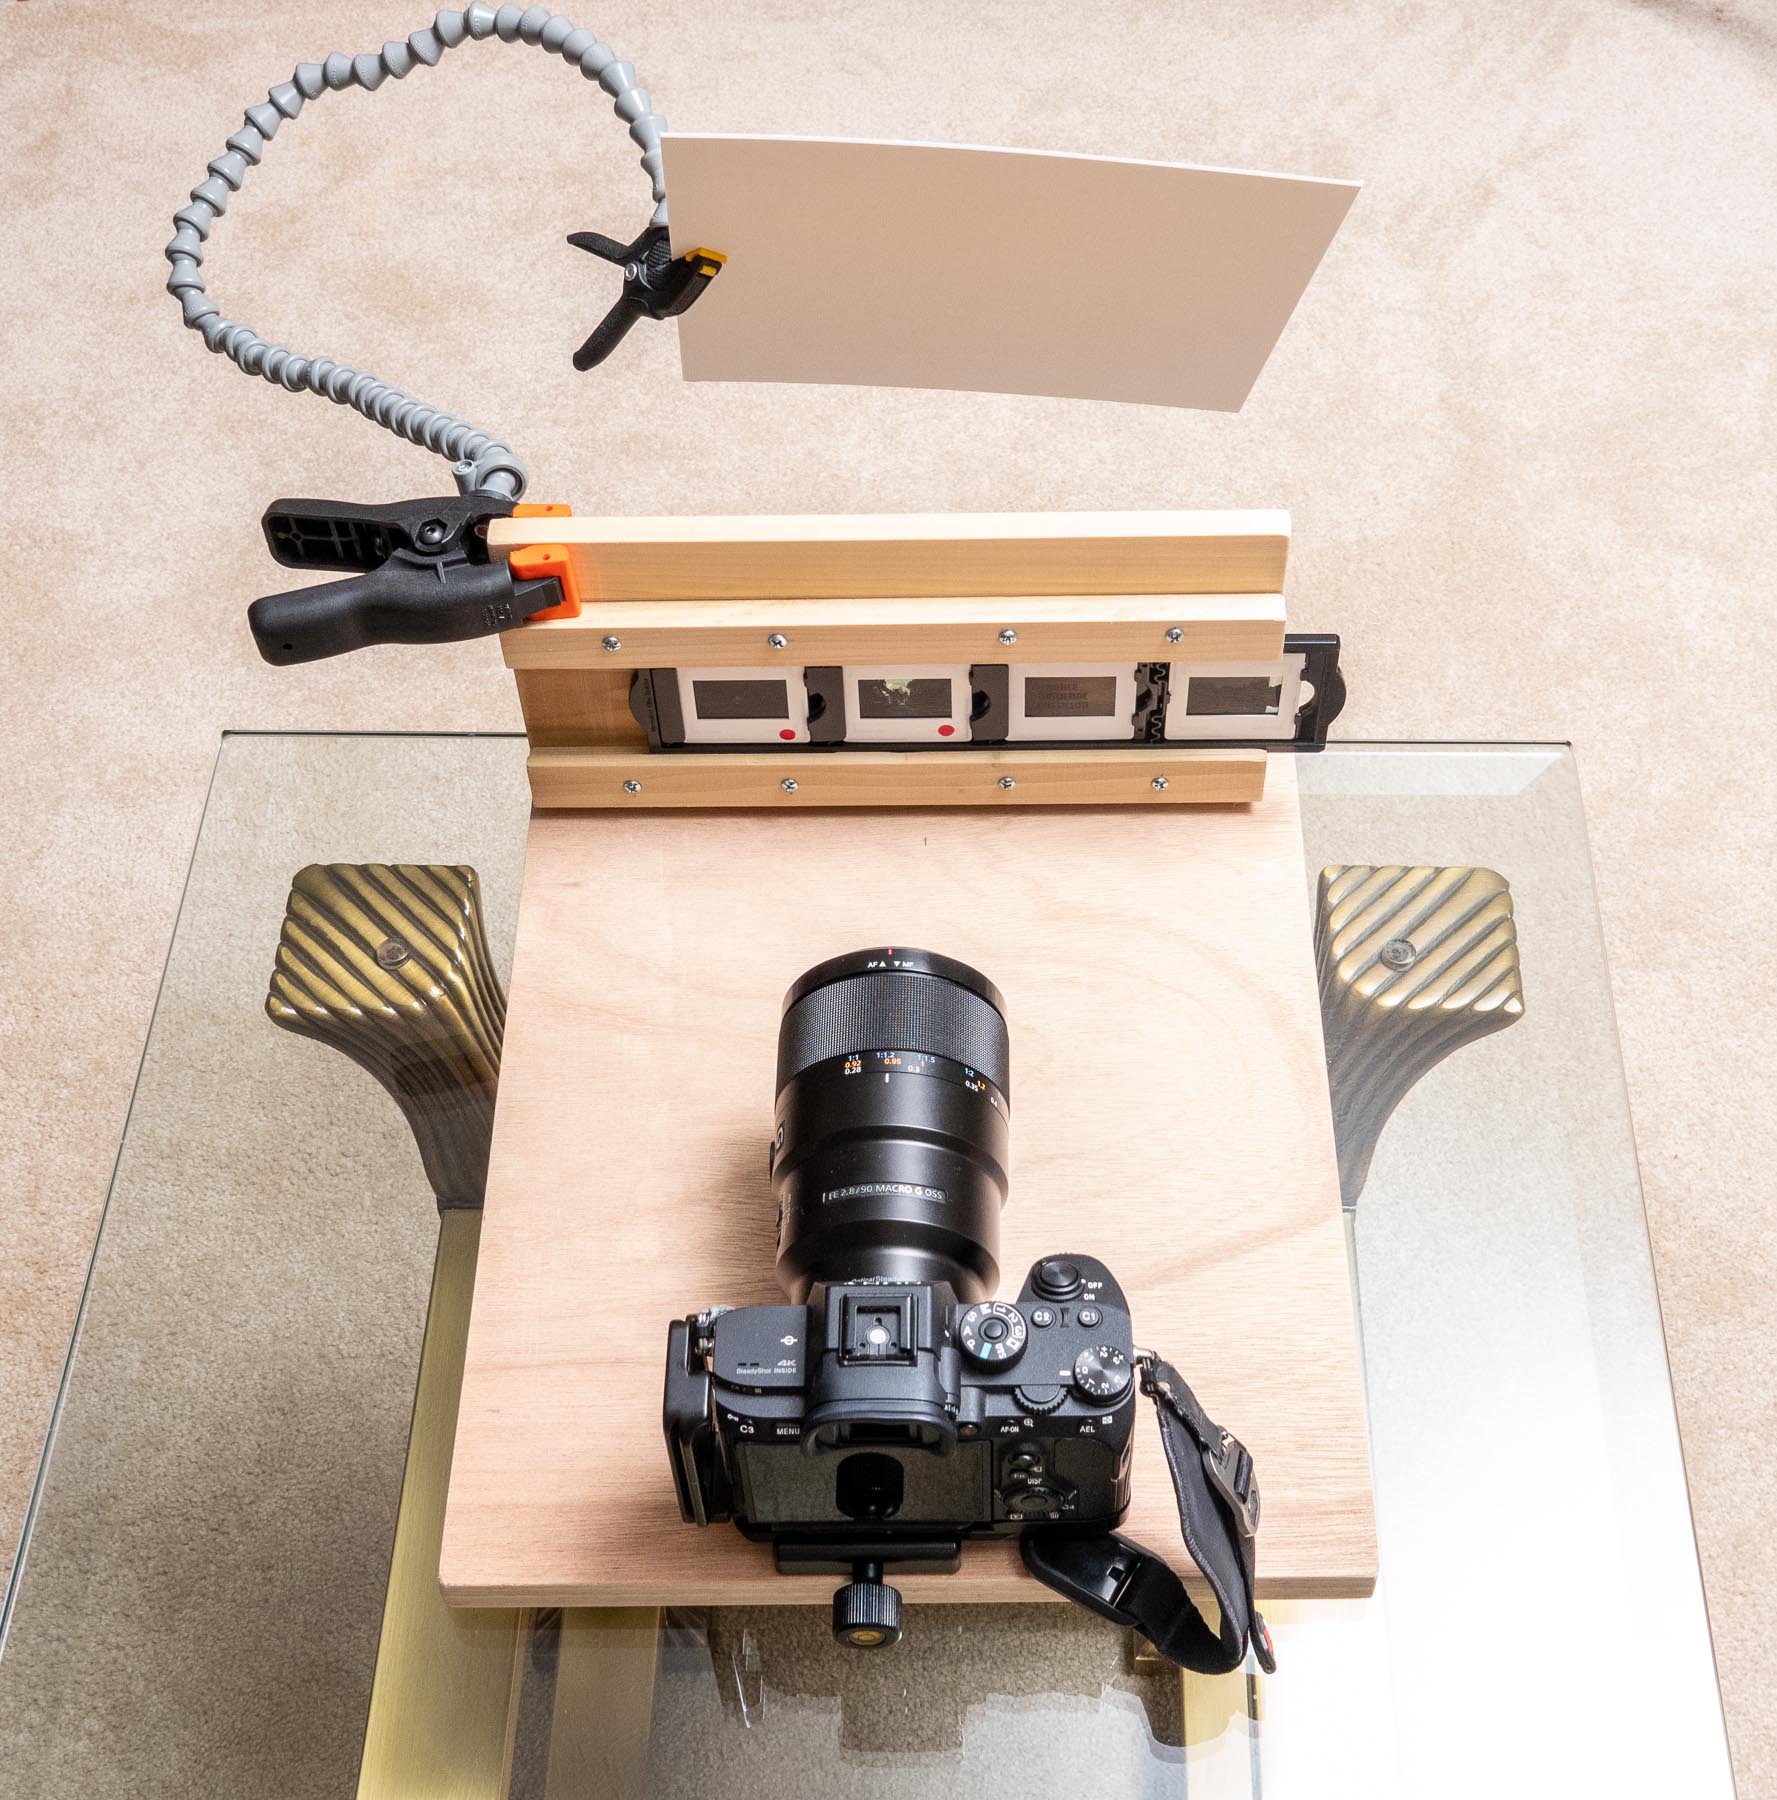
I’m OK at woodwork, so that is how I decided to make this – it could be built with plastic parts, or if you have a friendly uncle with some woodworking tools, I made it in about 3 hours or so. What is behind that white card at the top of the image?

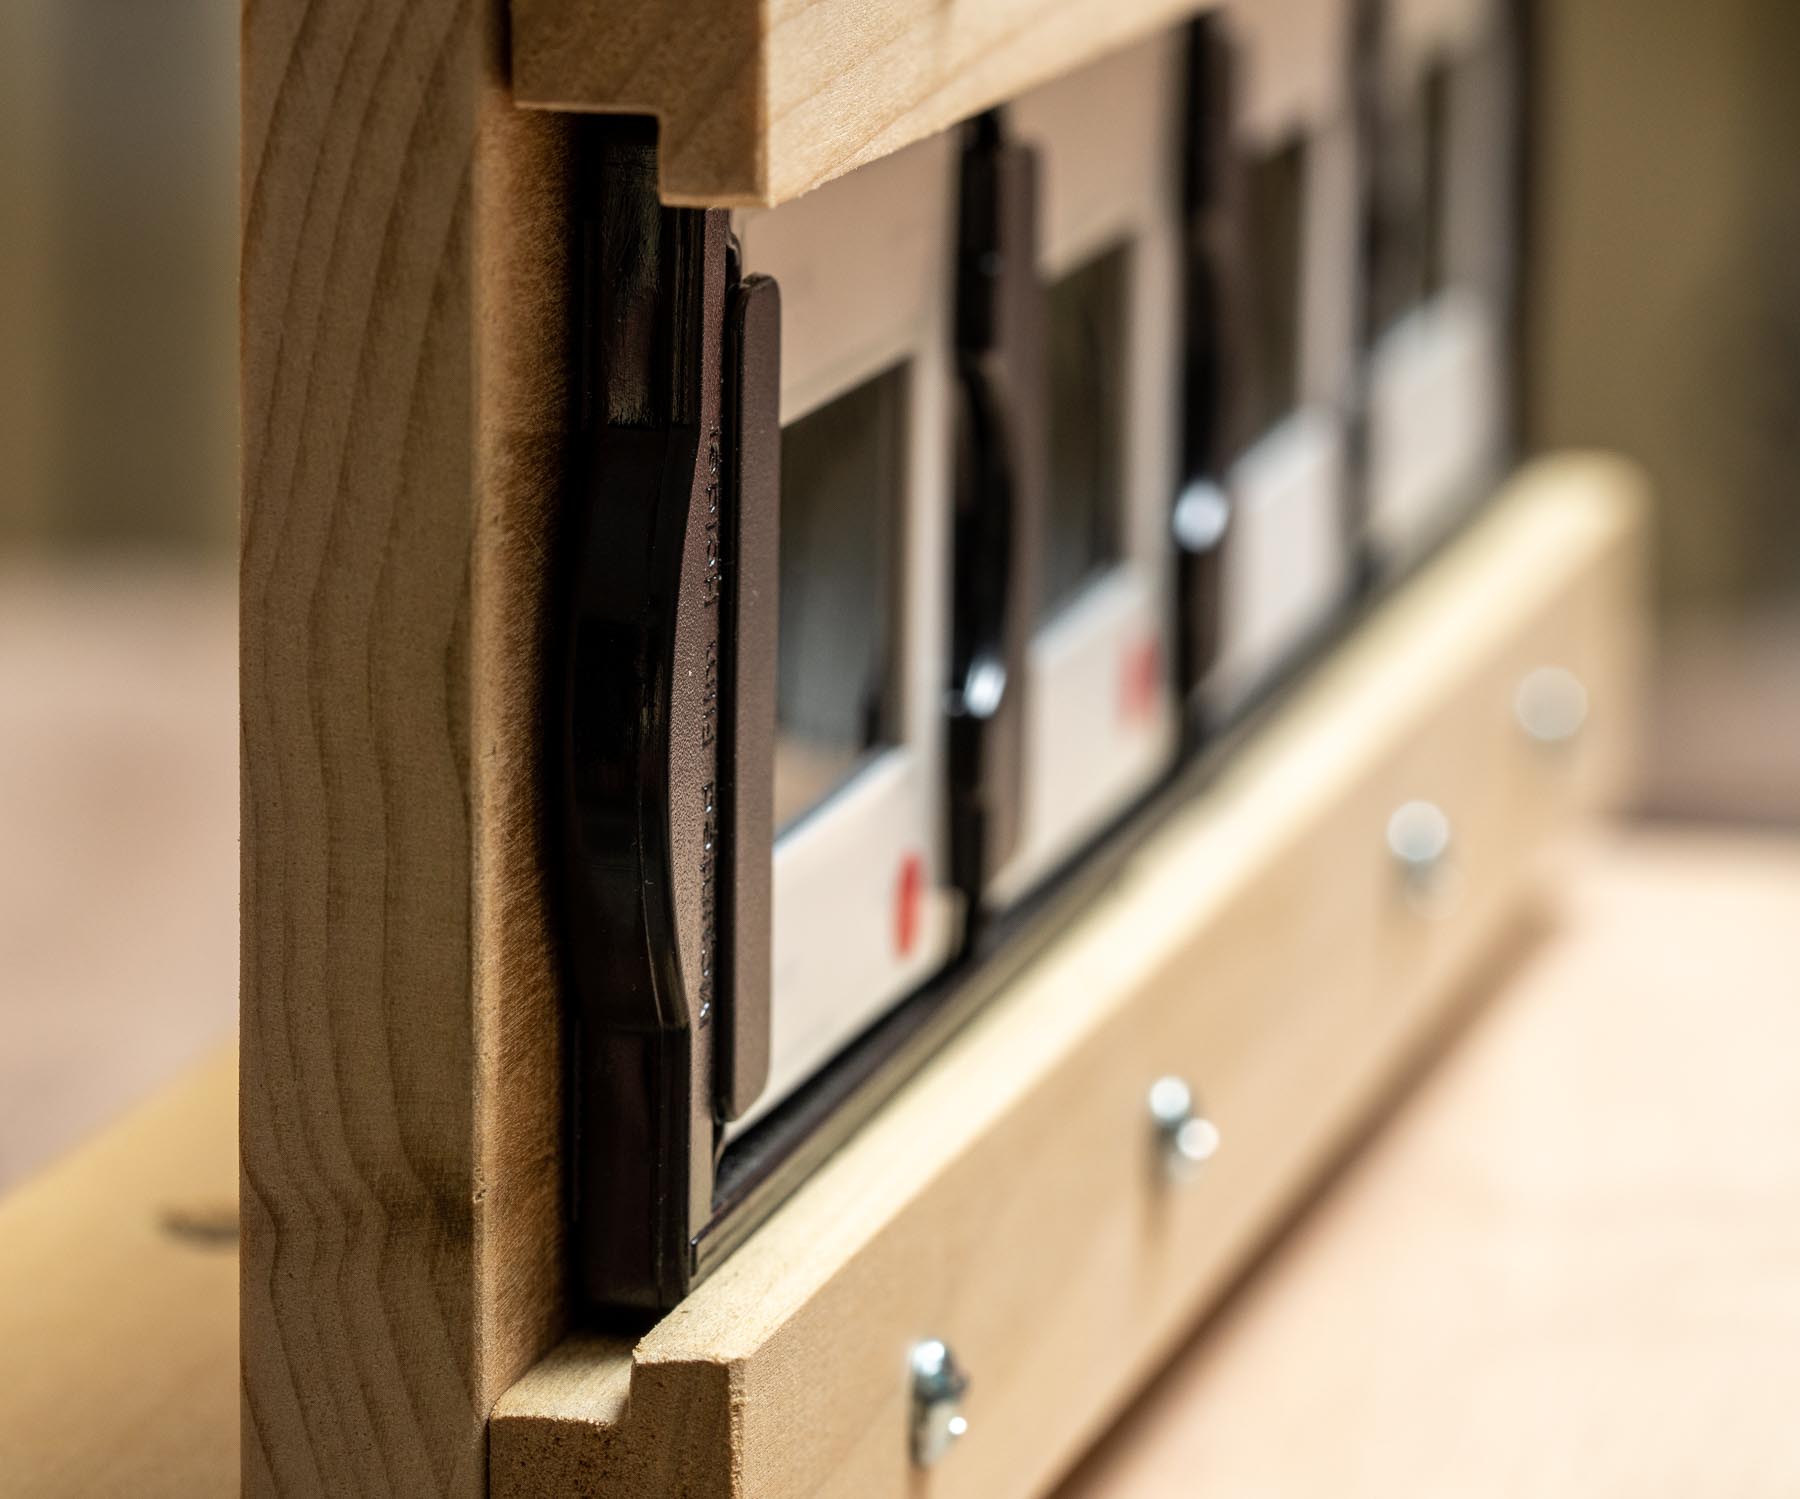
The whole thing is about 35 cm by 25 cm or so and I made it with things I had around – offcuts of previous carpentry projects, a quick release mount for the camera L-plate etc. but the main thing I bought was the slide and film holder. I wanted something that was well made, was easy to clean, quick to remove and fit with new slides etc. and I found it with the Plustek slide and film holder kit. This is made for an expensive Plustek scanner and cost $29 – but it served my purposes completely.
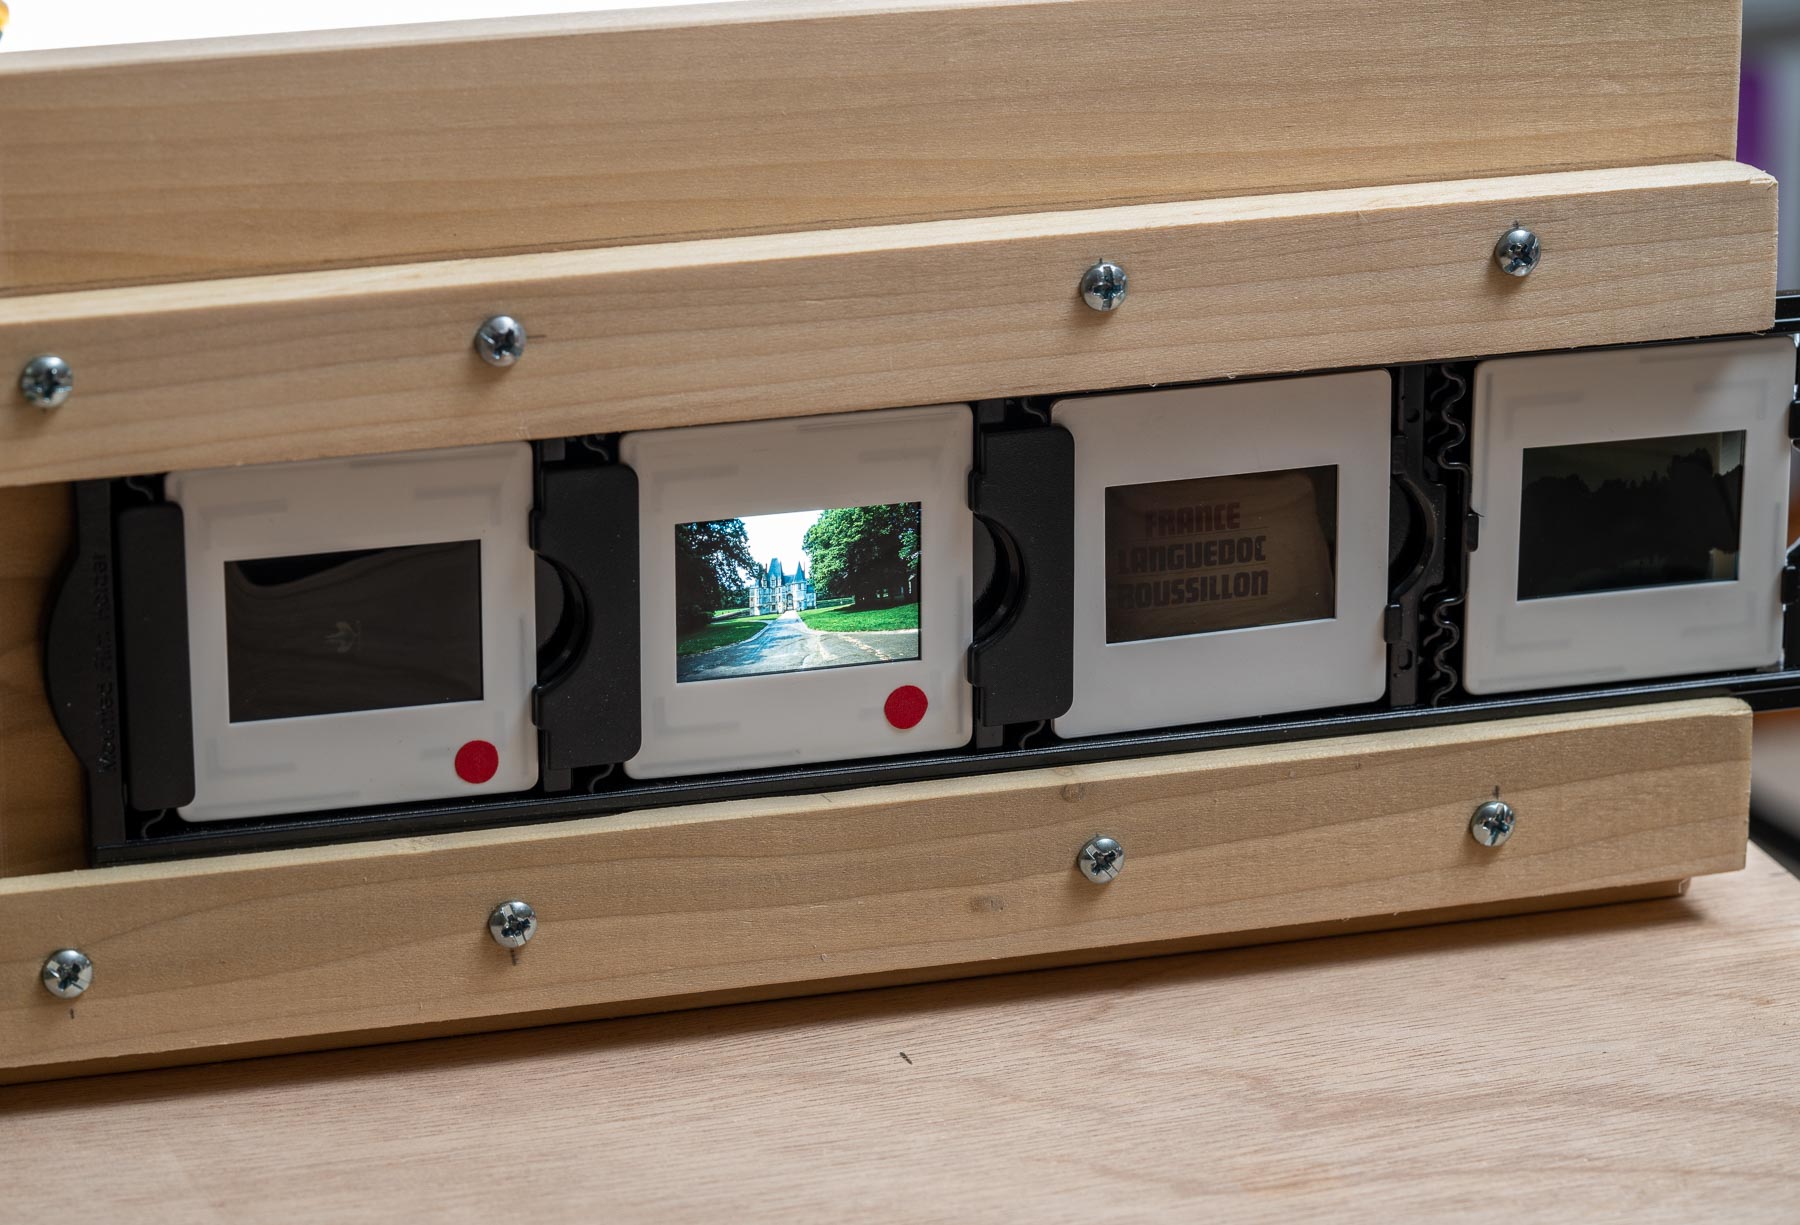
Each slide position is spring loaded to allow you to quickly clip the slide into place and my Kodachrome and Extachrome plastic mounts fit well in the holder. Each opening has a little lug cut out in the center of the frame on the bottom edge of the holder which I used to center the slide over the lighting cutout:
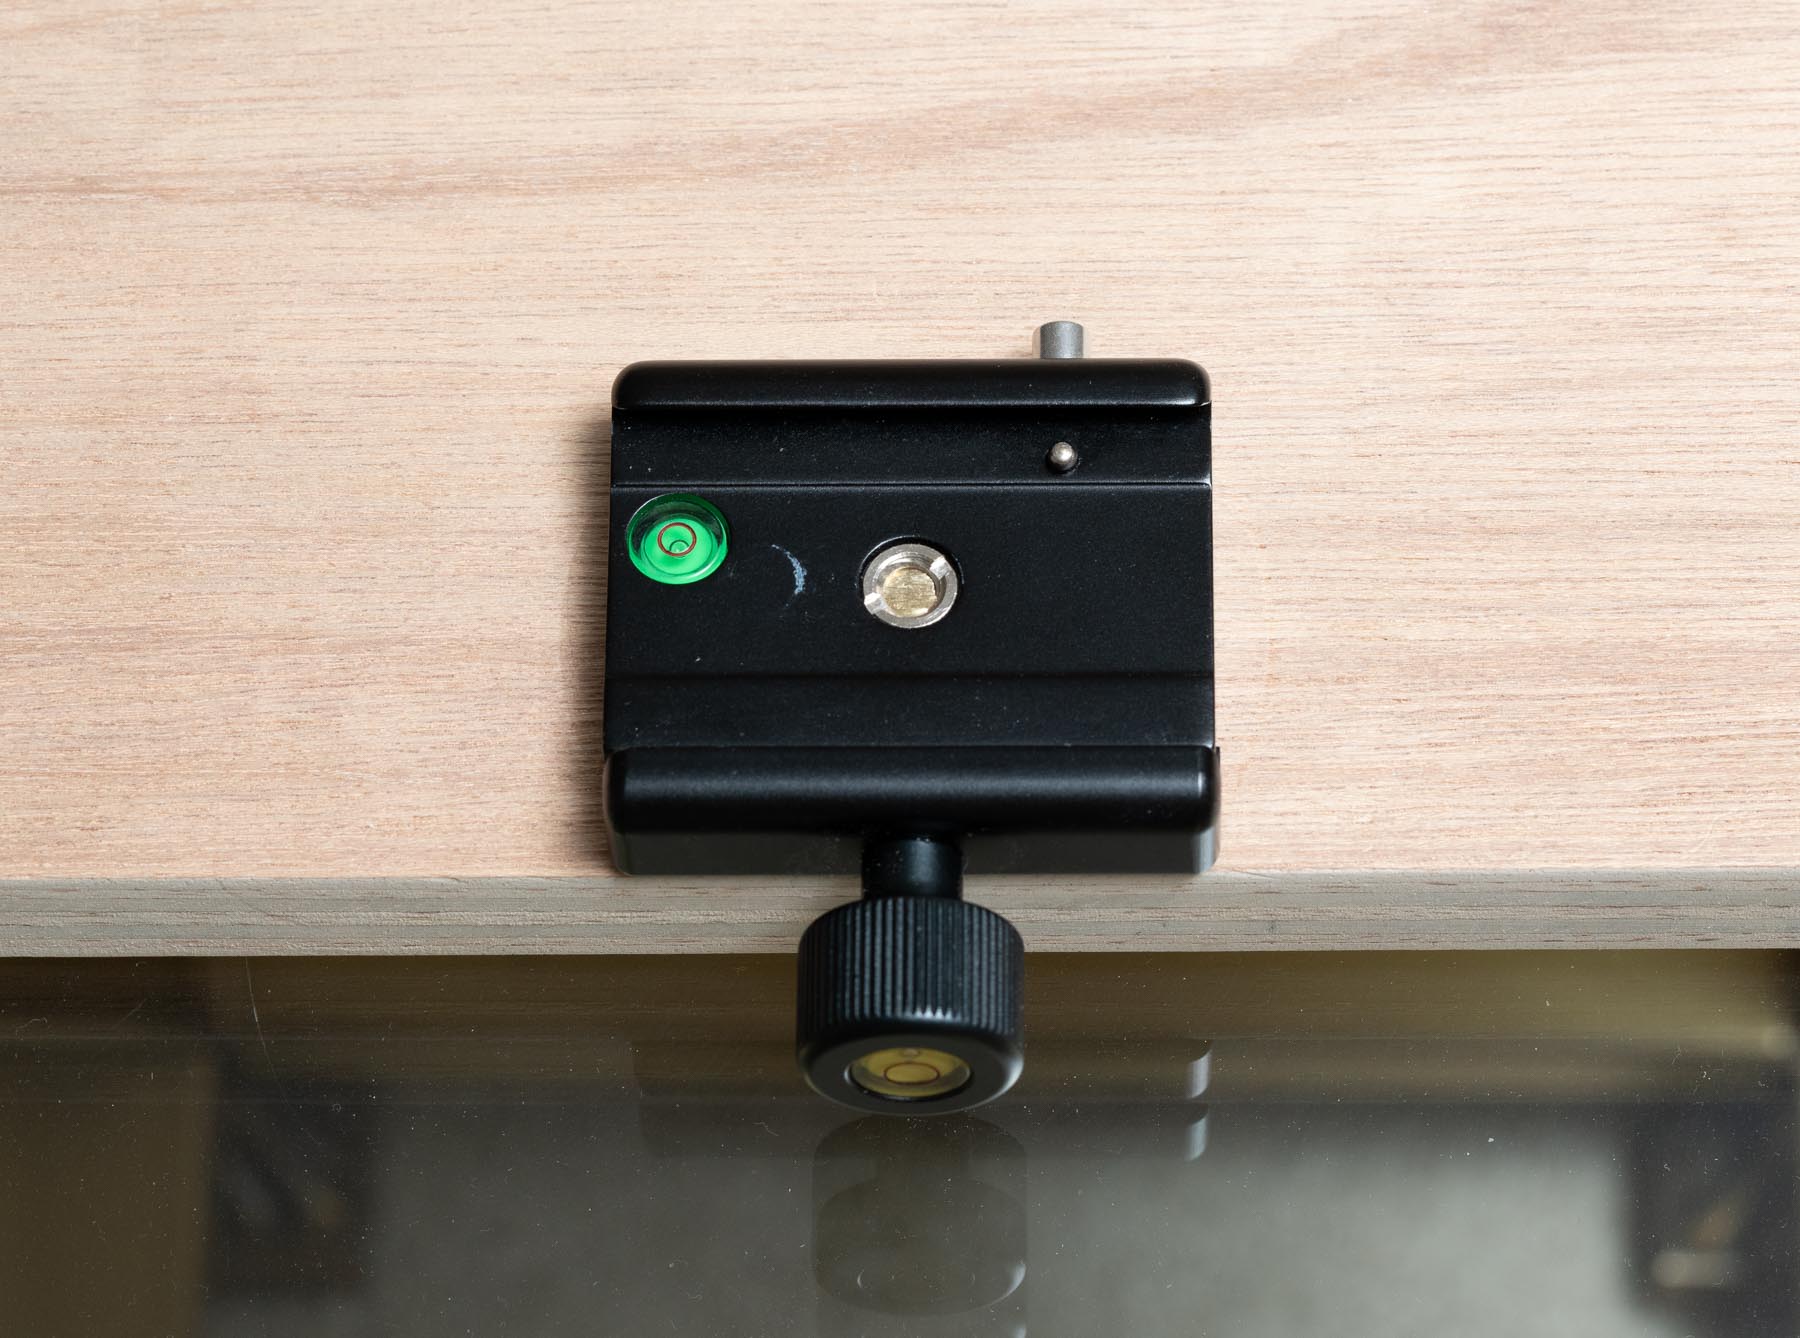
Once these arrived, I was able to do a rough mounting of how it would all fit together. I wanted the camera to be solid and fixed and so I screwed a tripod mount into place at the end of the baseboard:
With the camera firmly mounted, I was able to move the film holder backwards and forwards until I had the film plus some of the mount visible in the camera screen. With such a large resolution on the camera, there is no downside in taking a smaller image of the slide by giving yourself more room to line it up accurately. So to avoid making this too difficult a project, don’t try to zoom in too closely to the actual image itself.

As you can see here, I didn’t really mean to have this off-center vertically, but the tolerances of my woodworking resulted in a slight deviation from the plan. Because I wasn’t trying to be too close to the film itself, it didn’t matter!
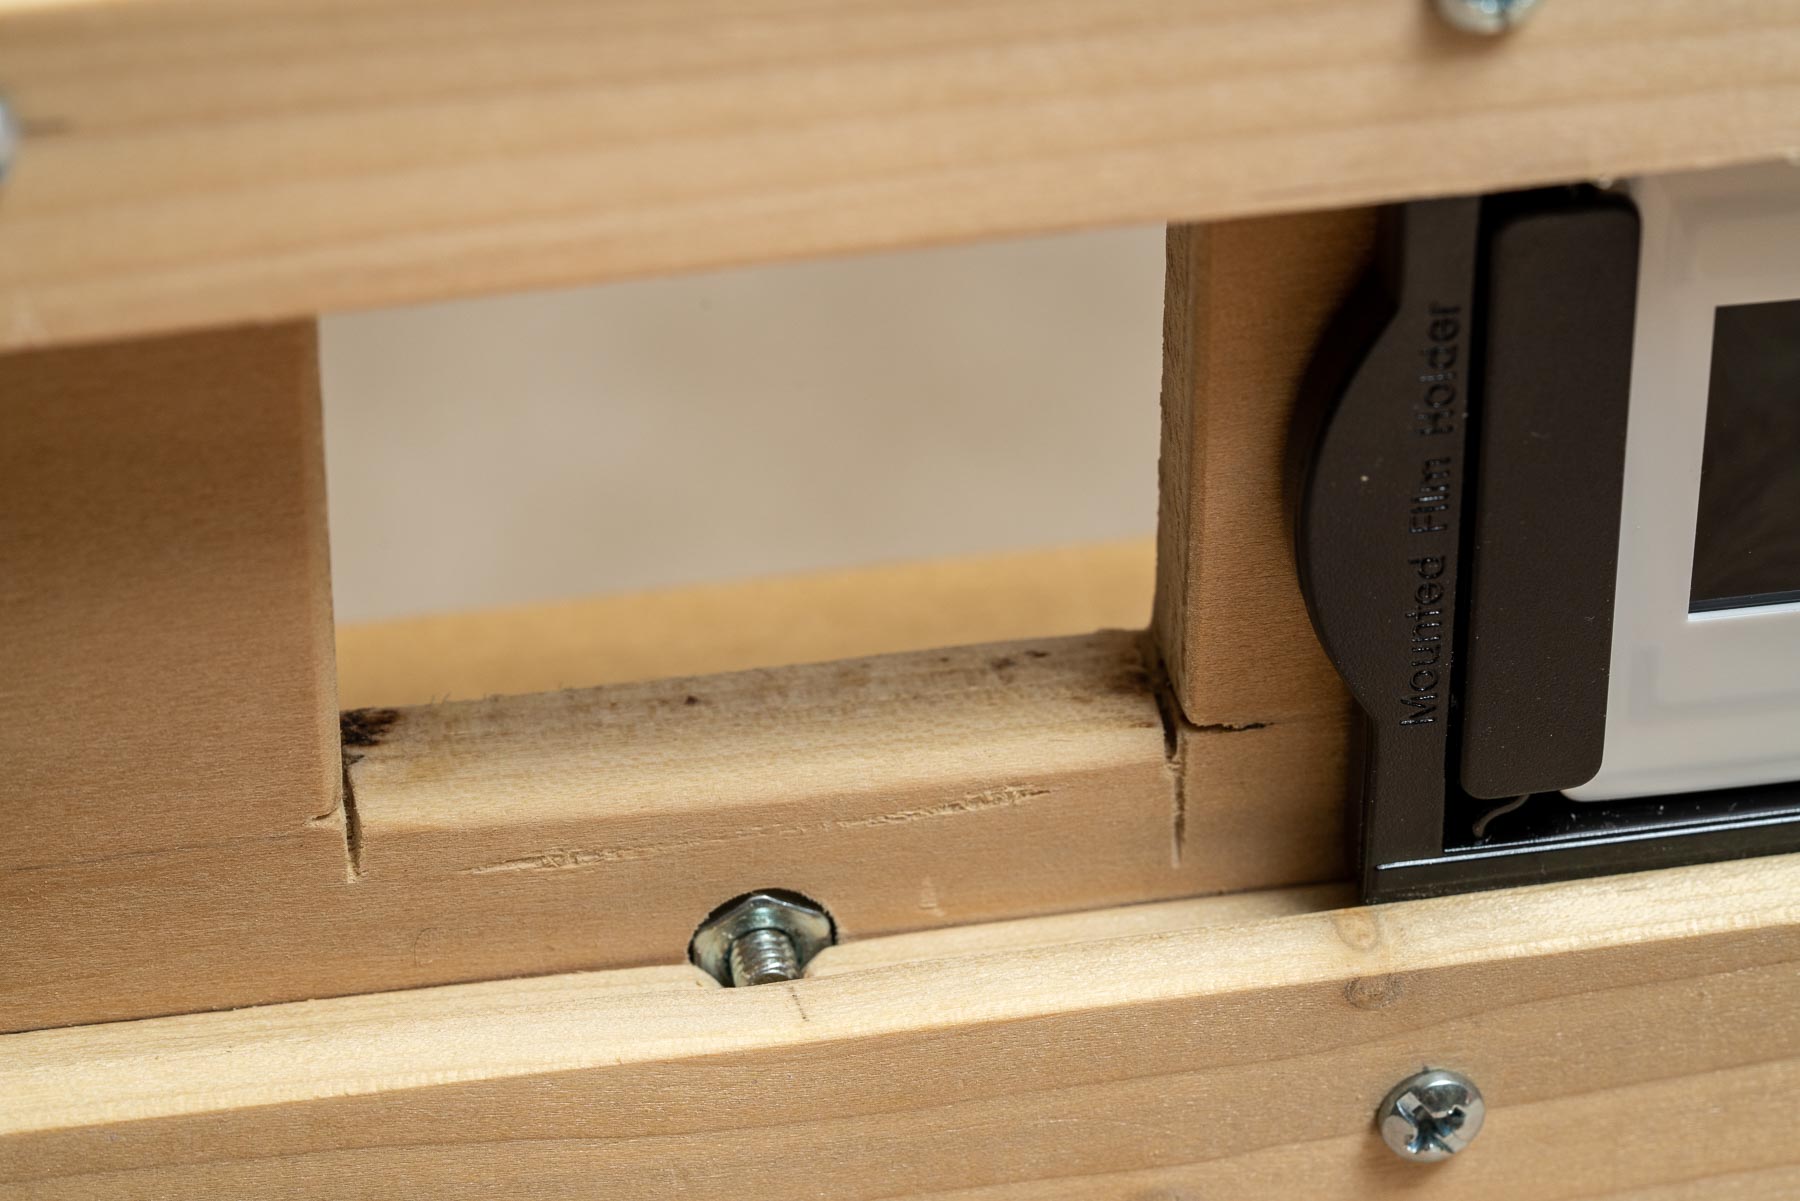
Once I had found the distance from the film to the camera, I worked out, by trial and error, how high the slide mounting should be. I then cut a 4 x 5cm hole in the wood using an oscillating cutting tool. Drilling holes in the corners and using a jigsaw would work as well:
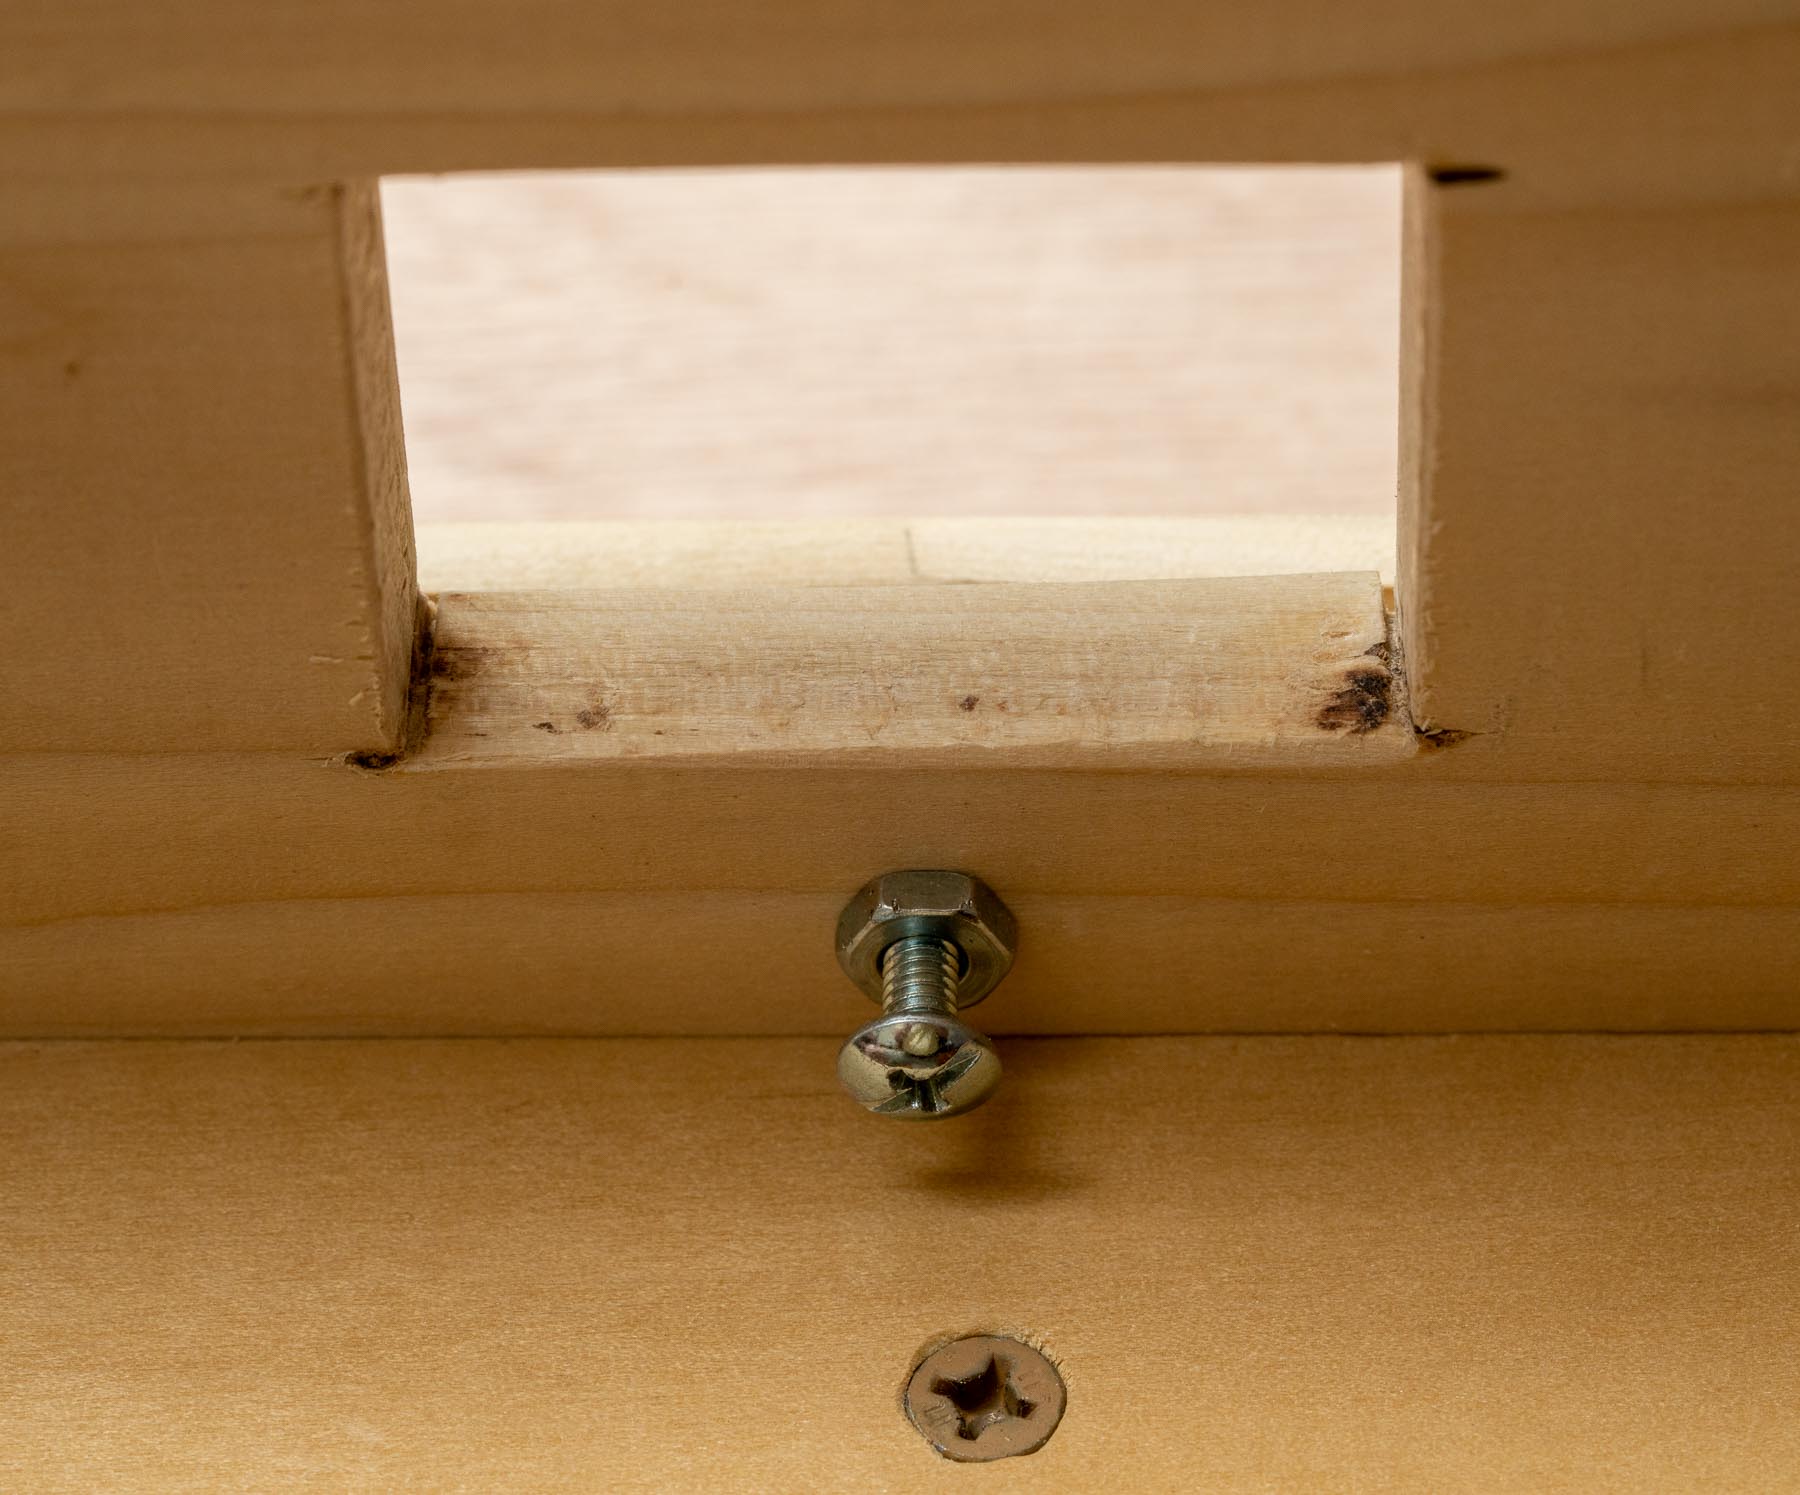
This the view from the rear showing the cutout and the bolt that aligns the slide in the frame. Then I made the runners themselves. These are simple pieces of wood with an L-shape groove cut out of them using a router.
I cut a bit deeper in the top one to allow the film holder to rise up slightly over that centering pin. There is a little bit of play but not too much as I wanted the slide to be held vertically to keep the focus as good as possible.
I can quickly slide out this holder and fit new slides into it and then take shots of those four, or exchange it with the 6 shot film holder:

For lighting, I decided that the easiest approach was to have a white card (a bit of mount from a picture frame) at 45 degrees with a flashgun and remote trigger laying on the floor under the table. As you can see, I can sit this on a glass topped table and so I’m investigating simply laying the card at 45 degrees on the top of this piece of wood above and simply have the flash under the glass table.
With the flash underneath the rig, I have no issues with having to shield the lens from the flash, and with a manual flash setting, my trigger is a very simple one as well. It just triggers the flash, no more.
My early experiments on exposure aimed to produce a pure white, just over-exposed file when no slide is in the opening. As I take this as a raw image, I can over-expose more than that and bring the brightness back in any pure white bits of the slide. With ISO 100 (for minimum noise in the shadows), I used 1/160th second at F9 with the flashgun on 1/4 power. I’m using an old Canon 550EX speedlite for this with Phottix triggers. I use a 2 second delay on the camera shutter to minimize any chances of tremors when I take the shot. That aperture should give me a sharp image even with a slight bow in the negative or slide. I don’t think I will need to refocus for each shot – the rig is stable enough that the slide to camera distance will be very similar from shot to shot.
As you can see, I used screws so that I could readjust if necessary, but so far, there has been no need for that. I think that pretty much completes my explanation of how it works – if you have any further questions, please let me know in the comments below! Now on to some copying – perhaps there is a great historic stock photo in there!


Ingenious!
Very well done. I liked the photo with a big beautiful house. What kind of place is it?
Well – one of the issues I am finding is that I can’t remember where these images were taken. I know it was taken in France in 1980 and it is of a French Chateau, but apart from that I have no idea where it is!
Steve
I thought it was your parents house and you grew up in it.
I wish – then I would have had a property release! This is where I spent my earliest years. The one with the green door I think: https://www.backyardsilver.com/wp-content/uploads/2019/07/IMG116.jpg
Steve
I found this castle!
Château d’Ô Normandie France Chateau Medieval, Medieval Castle, French Architecture, City
Wikipedia
https://fr.wikipedia.org/wiki/Ch%C3%A2teau_d%27%C3%94_(Orne)
Congratulations! That has saved me a lot of research. Now who wants to buy a 40 year old photo of a french chateau that looks the same now as it did then??
French Ebay offers for such a photo 20 EUR. You can sell it for 200 EUR with this description:
“The famous castle Château d’Ô immediately after the restoration, which was carried out by the famous French writer and owner of this castle Jacques de Lacretelle.”
Perhaps there is a connoisseur of unique photos. 🙂
Now that is interesting. If only I had gone before it was restored!!
Hi Steven,
I have the same problem of yours with my old slides (my father’s inheritance). I solved it with an Epson perfection v550 scanner (a bit more of $200 )
You have to discard the plastic frames, but you scan a set of slides at once! The result seems very very good! Please have a look here at this digital copy (reduced to 800 pixels width from the “original” 6408×4091 pixels) of a slide of the year 1952 https://luisafumi.com/dia005-800.jpg
Cheers
Luisa
Yes, I have an old Epson Perfection 1650 that does very reasonable scans of slides. But there is no longer a Windows 10 driver for it, although a company called Vuescan makes a program to scan documents and films that includes drivers. It is fiddly though and if you have to remove the plastic mounts as well, that doubles the hassle! It was pretty slow to scan as well although the results were good. With my new rig, I scanned 30 slides in no more than 15 minutes and they are all pretty easy to correct in Lightroom.
Steve
With my Epson I can scan – if I remember right – 16 slides in less than 2 minutes. There is also the possibility to scan together 4 slides with frame, it seems at least equivalent.
I’m sure you are right. Mine is an old one that only does slides down a narrow section of the scan area. Certainly I found it slow and annoying plus the application to get the drivers was around $70. But I won’t recommend changing your approach if it is working for you!
Steve
Steve….excellent project with the slider …!! I also have loads of 35 Mm slides to scan…since been taking pictures since 1985…!!!. But just wondering why you say they won´t be any good to agencies ..???
Cheeeerrrssss…!!!
Hi Ray
I’ve not scanned many slides so far and so can’t give much of an answer about their suitability for modern stock. I’m taking the view that there is a market for images from the 1970s and 1980s, but they need to show something interesting about that time period. The image I showed in the article about the French Chateau is unlikely to be interesting, because it looks exactly the same now (as far as I know) and so a grainy 35mm slide of something that can be photographed in high resolution detail is unlikely to get many sales. Time will tell whether I come across ones that are unusual or interesting because of when they were taken.
Steve
Brilliant!
Thanks Jim – it is actually pretty quick and easy to use. I set the exposure for a blank slide which should be pure white and then every slide is taken with the same exposure. There is a lot of latitude to open up shadows, although I must admit to be generally disappointed with the quality of film!
Hi!
I don’t own a macro lens, I would need to buy one in order to use your proposed solution. If I understood correctly, yours is a 90mm. Those seems more expensive. What would be the minimal specs for a macro lens in order to be able to scan slides & negatives?
Thanks!
Hi Sylvain – it really depends on how big a digital file you are looking for. I already had a macro lens and the 90mm is just the length that Sony produces. Macro lens also tend to have a much flatter plane of focus so they do better at focusing all elements of a flat surface onto the sensor. But the files I end up with are much larger than the resolution that you used to get with film. I remember reading once that the resolution of film (in terms of the size of the grain that makes up the image) is about 8Mpixels, or 4000 x 2000 pixels. I end up with files that are closer to 8000 x 5000 and so I have a lot of “wasted” resolution. What I’m getting at is that if you had a lens that focused close enough such that the image of the slide fills about half your screen, you would probably end up with a very acceptable scan of the film. The resolution might then be around 4000 across – although it does depend on the resolution of your camera. So you can try this with a reasonably close focusing lens rather than a macro one. If you stop down to F8 or F11, you would get a sharp image across the entire slide as well.
Different focal length macro lenses only alter how far away the camera and lens will be from the slide itself and so you could pretty much use any macro lens as long as you fix the camera at an appropriate distance to fill the frame. As I think you saw in the article, I didn’t get as close as I could – I wanted to have some of the frame of the slide in the image so that if I didn’t accurately align the slide in the holder it still would get a good image. Hope this helps
Steve
Hi,
I am about to embark on a similar project for family history. Would you please clarify the purpose of the bolt under the opening?
Regards,
Steve
Hi Stephen
My slide holder has a small cutout in the lower edge directly under each slide. The purpose of the bolt was to center the slide in the opening and hence in the center of the lens/sensor. It is probably unnecessary as you can do that by eye as well as I didn’t make the distance between camera and the slide so tight that there is little tolerance. A little bit of movement to either side would not make much difference.
Steve
Thanks, do the Plustek holders have these notches as standard or did you modify them? Also, do you know of any economical holders for 120 film?
They come as standard on both the 35mm slide and film strip. But as I say, it was an enhancement that isn’t all that important. I didn’t investigate 120 film holders – I don’t have any of that size of film.
Steve
Hi Steve, what size are your rails? They look to be about 25cm sq.
This sounds a little crazy, but I couldn’t find where I stored it this morning. I have scanned all my slides and I think it is in the box with the slides now down in the basement. However, similar sizes of wood are around my garage and they are 3/4 x 1/2 inch. Sorry – that is all my tape measure has! However, it is quite likely that I used a router to cut the groove on both sides of a piece of wood and then cut it in half lengthwise. US people tend to have these big tools in their “workshop”!
Hope this helps. The only critical part of this was to cut the groove so that the slide holder can slide smoothly, but not wobble back and forwards to spoil the focus.
Steve
Thanks, I understand imperial as well as metric. That would make it about 20cm x 12 cm. I am from Australia and was brought up on inches! I do have access to a full woodworking shop.
I have had great success with my current copying rig, basically the same idea as yours but a little less efficient. I need to increase efficiency otherwise I might as well use a scanner. I have thousands of old negatives and slides to go through, mine, my father’s and my grandfather’s.
Regards,
Steve (great name BTW!)