Promote Remote Control with the Canon 5D Mark II
I’m keen on realistic HDR images, and one of the restrictions in Canon firmware (at least in the 5D Mark 2) is that you can only take three exposures automatically, which normally means that I take one normal one, one at -2 stops and one at +2 stops. While this captures most of the information, it is recommended to take 7 images separated at 1 stop intervals for best quality output. I also often miss being able to set up time lapse shots – for example, if I am trying to take pictures of myself, I often resort to the use of a small wireless remote, which either means that I have to clone it out of the shot, or end up looking as if I have a severely disabled hand as I struggle to hide the remote from the camera! A solution to this is the Promote Remote, which uses a USB cable (and optional shutter release cable) to control the camera in ways that you can only dream of! You can use it for:
- A manual shutter release to avoid camera shake
- A fully featured HDR exposure controller allowing any number of exposures starting at any shutter speed, and locking up the mirror if needed
- A fully featured time lapse controller taking a defined set of images at various times, including a setting to delay the sequence
- A combination of time lapse and HDR to take a series of HDR images at pre-defined times
- A “bulb” shutter release where the shutter stays open for as long as the button is pressed
I’m going to write a separate post about using the remote for real-life, but the handbook is so complex, and there are some real quirks that I had to work through, that I decided to post a “how to use it” explanation first.
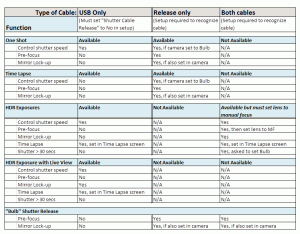
The main complexity is that most people buy the optional shutter control cord as that allows you to use the most functionality in the device, but when I received mine, plugged in both cords (as you do…), I just could not get the thing to work! Eventually, much later in the handbook I discovered that you need to visit the setup screens to tell the unit to use the shutter release cord. But wait, there is more – the device works differently depending on which cord is in use. This may be because of issues with Canon functionality, but after several reads through the handbook I decided to create a small table to remind myself of what works and why! Hence this post.
The first thing to note is that you generally only need one cable for most of the normal functions. For instance, the shutter release cable works fine if you only want to use the time lapse controls. The USB cable works for HDR images as long as you don’t want mirror lock-up (and you can get round that by using Live View first and then triggering the HDR sequence) or exposures greater than 30 seconds. Only if you want those long exposures do you need to use both cables. I also found that with both cables, HDR only worked if the lens was set to Manual focus – which is a good approach, but it is really confusing when you are testing the device as no errors are reported.
The table is pasted below at a smaller size than “real-life.” Click on it to see the table on its own screen.
Update on using the Promote Remote for real photographs:
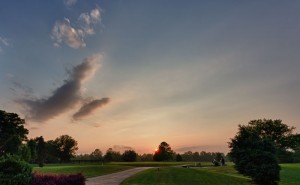
Having spent several hours trying to work out how the device worked, I decided to put it to the test with an extended HDR test of a sunset coupled with some time lapse shots. I set this up on my deck (and the sunset was nothing to write home about, but that wasn’t the point.) With the camera on a tripod and fully facing the sun, I decided to take 9 exposures at 1 stop intervals around the base exposure which would give a bit of detail in the foreground. I then set the time lapse up to take one series of 9 images every 5 minutes as the sun set. Consulting my table, told me that I only needed the USB cable for this function, as I didn’t need mirror lock up or long duration exposures. I set the camera, and went inside to have my dinner.
After 20 minutes or so, I went to get the camera and was pleased to see that it had taken the required shots and everything looked to be good. I imported to Lightroom, set the color profile and auto lens correction option, copied this setting across all the images and then uploaded 9 shots to HDR Efex Pro. Processing took a little time, but when I came back, I was presented with a set of pretty realistic choices across the various presets that come with the software. My favorite one happened to be a profile that I downloaded and added to the plugin – “natural landscape.” By the way, these are free from Jason Odell and Tony Sweet. Back to Lightroom to add a little color saturation, and a gradient to darken the sky down towards the sun, and the picture is complete. No prizes for this one, but it does show a very nice gradation of colors, little noise (I used ISO 100), and overall a very pleasant rendering of a high contrast scene going from dark shadows in the foreground bushes through to the sun being fully visible in the shot. With the standard Canon option of three images, there is no way I would have got anything like the quality that I see in this image. I’ve recently updated my thoughts on the Promote Remote after more experience with the device.


1 Response
[…] you can get from the careful use of HDR. As usual, I use the Nik HDR Efex Pro software, and the free downloaded profiles mentioned in the previous post. The remote was very easy to use, I followed my own guidance in the […]