How to Edit, Keyword, and Upload 650 Stock Photos (Fast AI Workflow)
Introduction – keywording 650 photos in six weeks
Over the past six weeks, I edited, keyworded, and uploaded roughly 650 stock photos—ranging from travel landscapes in Europe and the UK to commercial data centers and local Texas architecture. I’ve written a lot about using ArtushVision AI as the new mainstay of my keywording and descriptions, but I’m probably guilty of making the whole thing too complex for newer photographers. Partly to have a record of my approach and things I have learned for my own benefit, and partly to give a simpler overview of my approach, I decided to write this one. Incidentally, I think I spend about 1 minute per image on average creating the metadata using this approach.
Lightroom is the core of my approach – but doesn’t have to be
For me, everything starts with Lightroom Classic. I’ve been using it for 20 years or so, and all my images are in one catalog currently around 150,000. I process most images just in LR, going into Photoshop for more complex composites or removals of distractions. Because my images can have multiple uses – stock photos and different approaches to selling them as prints, I want to both be able to find an image quickly and then, when I export a larger version for a new print outlet, I want the keywords and descriptions to be exported into the JPEG to make uploads to a new site easy and efficient.
So, keywording in LR is critical to me. I have searched for a few years for a system and approach that makes it easy to keyword the original raw files and only recently have I found that.
I know that some photographers don’t take this approach and are happy just to keyword the JPEGs that they are going to upload to stock agencies, so I have written this article in two sections – the first about Lightroom, the second on keywording JPEGs. Jump to the second section if that meets your needs.
Section 1 – adding metadata to the raw files in Lightroom
- Process the raw files in the develop module. I use a Flag to indicate those images that I think are ready for upload to stock or print sites, and I add one star to images that need to be uploaded as editorial.
- Select all images with a flag in LR. These are the ones to be keyworded. Right click one of the selected images and choose “Save Metadata to file”. This creates a small sidebar file associated with each raw image holding details of develop changes as well as their flag and rating status.
- In ArtushVision, open that specific folder containing the raw files. The App will create small thumbnails and give you the ability to use its AI models to create appropriate metadata for that image. I usually do this one by one as I like to look at the results and edit if necessary. I also copy and paste to similar images as needed.
- Once you have metadata in place for all the flagged images (with editorial captions for those with one star), click Save in ArtushVision and it will save all the metadata into those sidebar files (or into the DNG files if you use that approach).
- Back in Lightroom, select all those flagged images again, right click and choose “Read Metadata from Files”. This will put all the keywords, titles and descriptions into the LR catalog database.
- ⚠️ The Lightroom Keyword Trap: Lightroom Classic has an annoying default behavior—it automatically reorganizes your keywords into alphabetical order upon import. This ruins prioritized search indexing for agencies like Adobe Stock and Alamy. Don’t worry, there’s a one-click fix for this in Section 2!
- I then export all my flagged images into JPEGS sized for the stock agencies (5500 pixels in most cases).
Section 2 – processing JPEGs prior to uploading
My JPEGs now have the metadata stored within the file structure of the JPEG itself. If you are someone who just keywords the JPEGs and ignores that Lightroom stuff, you will need to take the first step below.
- Open the folder containing your JPEGs in ArtushVision. If your JPEGs are not already keyworded, you would run through the keywording steps using the AI models and when you save to file, your JPEG will be updated with the metadata you have produced. In my LR case, the keywords are there but are in alphabetical order. I select all of them in ArtushVision, right click and choose “Restore keywords after LR export”. This recreates the original priority order you had before LR destroyed it! Adobe Stock and Alamy require prioritized keywords.
- The JPEGs in the folder are now ready for upload to all sites except iStock. I still use Stock Submitter and Microstock Plus for upload and submission, but the ArtushVision app does have a managed FTP process which uploads files and also uploads a csv file as needed to help with submission on some agency sites.
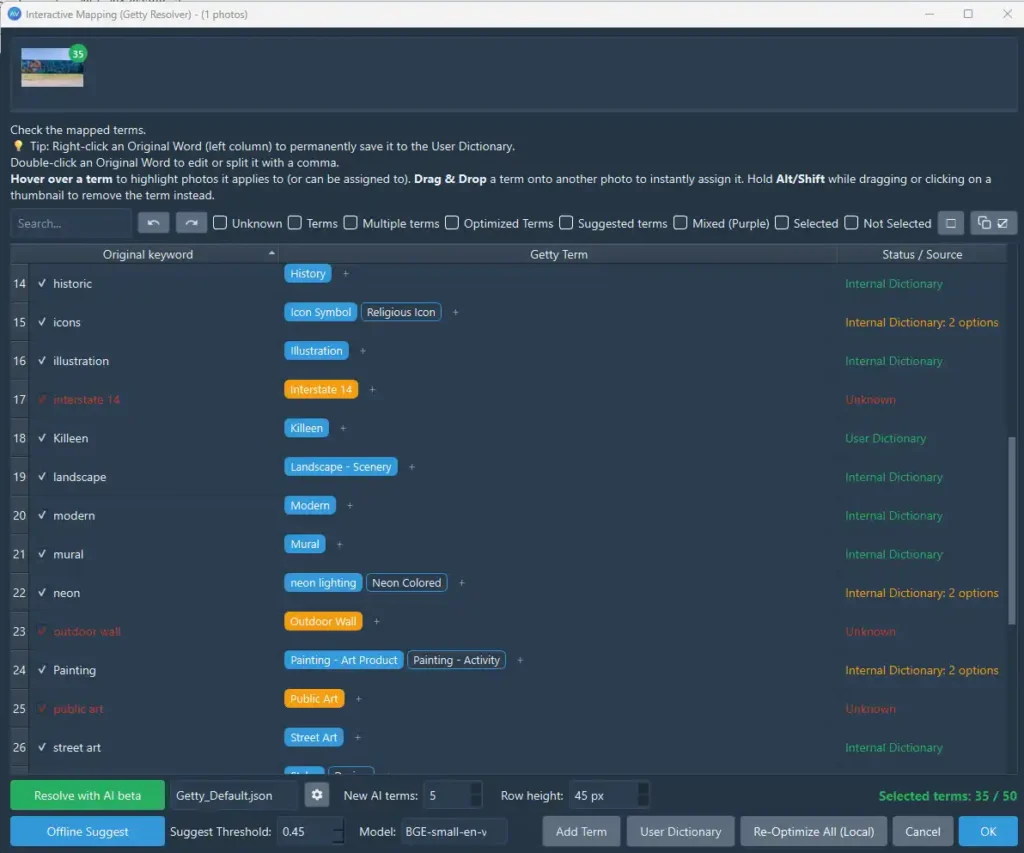
- iStock is next. They have a controlled set of keywords that they accept and you need to convert your keywords into that vocabulary. I select all files in the folder and add the country to the files in the categories area. iStock requires that. I then start the Getty Optimizer part of the process.
- ArtushVision lets you select all, or a subset of files, and open them in a window that has matched, as best it can, your keywords to the Getty vocabulary. There is an AI help here – Resolve with AI beta – that looks at the images, adds any controlled words it thinks are missing and deselects any unmatched words.
- It isn’t perfect, but it gets me 80% of the way there. I select words that I think might be in the full vocabulary (these are normally place names), choose the appropriate match where there are multiple options, and then click OK.
- The App has a neat way of managing uploads. Choosing Export for Getty will create a new copy of your JPEGs but with the controlled vocabulary keywords written into the file. I now do that, upload those files into a batch in DeepMeta, and quickly confirm that the keywords are fine and submit. Very smooth and easy.
Section 3 – preparing images for upload to Print on Demand sites
This will not apply to all of you. But for me, the next stage is that I review all my images and select those that I think might work as wall art. I then follow these steps:
- Export the original raw file and its “stock” keywords into a larger JPEG with some sharpening for printing on glossy paper. I export files at their full size for the print sites.
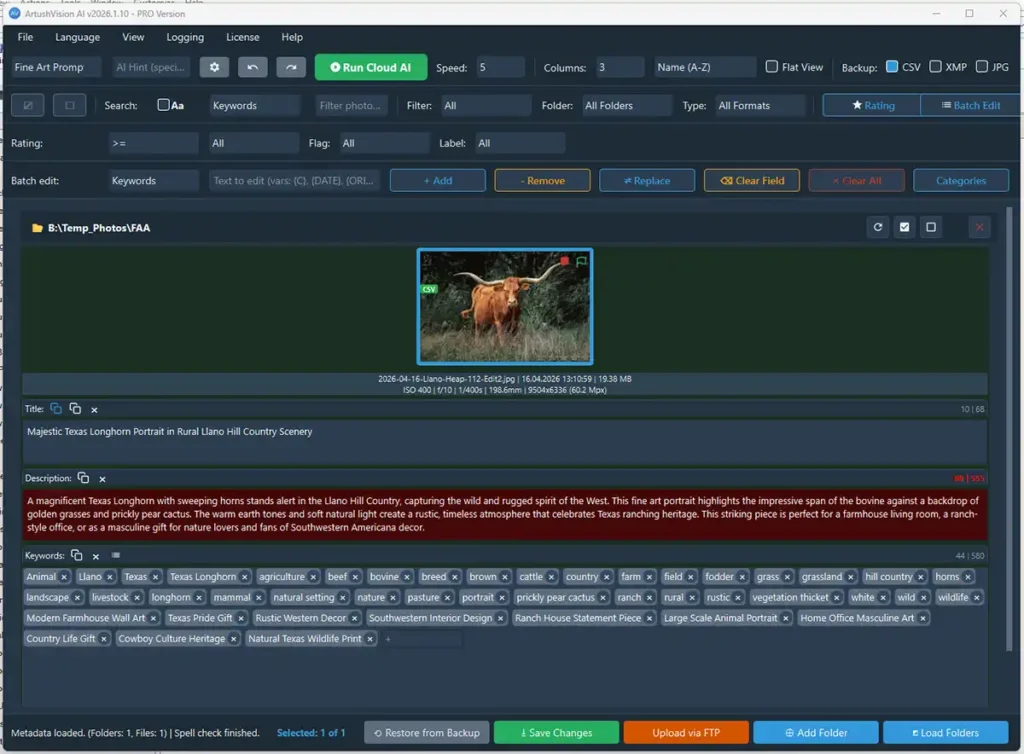
- Open this export folder in ArtushVision and run a special AI profile I wrote to tell the model to act as a professional fine art curator and write a short title for search purposes, a longer description aimed at a buyer of a print, and to add a few keywords that a buyer might use. My original descriptive keywords stay untouched.
- Save the changes to the JPEG (note – these saves don’t change the image elements in the JPEG – just the metadata).
- Upload to my Print on Demand sites, Fine Art America, Pictorem, and, for my best images, Etsy.
Here are the results of one such change to the metadata for fine art sites:
Summary
There is probably a lot in the discussion above that a new contributor will not necessarily follow, but my aim here was not to reproduce all the extensive help documentation on the ArtushVision website. I wanted to cover the entire process, not create a detailed user guide. I hope this helps – ask any questions in the comments below. And if you choose to buy the license for ArtushVision AI for $39, please use my affiliate link for downloading the App.
Incidentally, I should say that ArtushVision is just available for PCs at present. I have had a short discussion with a developer that has a solution for Apple Mac and iOS devices. I obviously have not been able to test it, but if you are interested, you can find out more details here.